Table of Contents
- Adding a Playlist
- Transition and Playback options
- Adding Media to a Playlist
- Creating/Editing Playlists with a large number of media files
- How do I preview the playlist’s content?
- Managing Playlists
- Additional Control Settings
Adding a Playlist
To add a playlist, you click on the “Add Playlist” button found at the bottom of the Playlist list.
- As a next step, you must select the type of playlist that you want to create. You can select among:
- Classic – Create a Classic Playlist. After clicking “Add”, you will be able to select the Media you want to add to the Playlist.
- Tagbased – Create a dynamic Playlist by using Media Tags. The Playlist will update dynamically whenever you assign or remove Tags from your Media.
- Dropbox – Link a folder in your Dropbox to a Playlist. You can then manage your content (Video, Images and Documents) through your Dropbox account.
- OneDrive – Link a folder in your Personal OneDrive application folder to a Playlist. You can then manage your content (Video, Images and Documents) through your Personal OneDrive account.
- Import CSV – Create a Playlist by importing a text file. Each line should contain the name of the Media item to be added, optionally followed by comma and the playlist duration for that Media.

- As a next step, you are requested to provide:
- the Name of the Playlist and
- an optional Description for it
- There are various settings available that you can enable. They are separated between Transition Options and Playback Options.
Transition and Playback options
Add a black gap between videos
- The transition between the two videos right now is gapless. The last video frame will display the screen with gapless transitions between back-to-back videos. If you want a 0.5s black gap between the videos, enable the above option on your playlist.
Image Transitions
- You can pick more than 23 different Transition Types and, of course, control the Transition Speed.
- Slow: 3-second transition
- Medium: 2-second transition
- Fast: 1-second transition
- Custom: Configure how long the transition will occur from one image to another.
Limitations
We are improving the Transition feature daily, but there are some limitations that you need to consider for now.
1. Transitions are available only between images. You cannot have transitions between images to videos or any other media.
2. If you add a playlist to a layout, do not enable the transparency option on that layer. Transitions will not work with the transparency option enabled.
3. Transitions are not available for 4K resolution yet.
Transition and sub-playlists
When you enable transitions in a parent playlist, all sub-playlists with active transitions will inherit the transition type and speed of the parent playlist.
Sync Playback
Players under the same account can be synced and display the content on the TV screen, which is synced almost frame by frame.
Random Playback
- Choose to enable the ”Random Playback” option. This option will randomize the media on your playlist, and the player will display these media on the TV screen randomly.
Keep Web Pages Open
- Choose to enable the ”Keep Web Pages open” option. This option will be displayed in your Playlist settings if you have at least one Web page entry on your Playlist’s filmstrip.
Keep Web-pages running on the Background
Normally, Web Pages and Web Widgets in a Playlist are reloaded every time they are shown. However, you can enable this option to keep them open in the background.
By default, Web Pages in a Playlist are closed and reloaded every time they appear on the screen. By enabling this, you keep all Web Pages in the Playlist open and never reload them. To set a refresh interval, check the ‘Advanced’ settings on each Web Page.
For example, suppose you have dashboards that must be refreshed frequently to display new content by activating this option. In that case, dashboards will be kept active on your player’s RAM to be displayed on your screen instantly instead of loading again from scratch.
RAM Usage
This feature should only be used with Players based on the latest Raspberry Pi 4 board with 2GB, 4GB, or 8GB of RAM. Using this feature on Players with 1GB boards might cause Player instability and corruption if the memory usage is too high.
IMPORTANT: This might reduce Player reliability if the memory is too high. We recommend using Raspberry Pi 4 Players with 2GB, 4GB, or 8GB of RAM.
Adding Media to a Playlist
You can see an empty filmstrip where you will add your media files:

Below the filmstrip, you’ll find your account’s media library with all available media files. You can see them all or locate them under their respective category (Images, Videos, Web Pages, Apps, Audio Assets, Documents, Playlists, and Layouts).
The first item in the media library is the special Hide playlist. You can use it to hide the playlist for as long as you want. If you use it in a playlist, when it loads, the player’s screen will get black since there is no media to play. When its duration ends, the playlist will continue with the following media.
It is useful when you want to create layers in a layout. For example, you can insert a media file in a layout, and on top of it, you can insert a playlist with your media plus the Hide playlist item in it. If you use the layout on your screen, you will see the top layer, the playlist. When the playlist loads the Hide playlist item, it will disappear temporarily, revealing the media under it, the first media you inserted in the layout. When the Hide playlist ends, it will take over again and continue with the remaining media, hiding the bottom layer in the layout.
Direct Assignment
With the Direct assignment option, you can add one or more media to a single or many Playlists at the same time.
Playlist Actions
- You can use the Search button to find your media file.
- By hovering over any media, you can:
- Click on the Preview (eye icon) button to preview the specific media
- Click the Arrow button to place it on the playlist
- Alternatively, you can drag and drop the item into the filmstrip directly
- Click the Pencil button to edit the specific media
- Upload any Media directly on your Playlist by clicking the “+Upload Media” button
- You can change the media files’ position by dragging and dropping them in your desired order.
- All media inserted into the playlist inherit their default duration except Videos with a fixed display time (the duration of the video itself), which cannot be changed.
- You can use the -/+ icons to decrease/increase the duration.
- You can also check the total duration of your playlist. This info is located on the right side of the filmstrip:
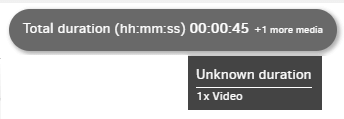
Which media are calculated? The media that are calculated are:
- Images
- Web-pages
- Apps
- Videos (YouTube videos are excluded)
- Documents
Clicking” Save” will create the Playlist.
Creating/Editing Playlists with a large number of media files
If your playlists contain numerous media files, you can activate the Folder View for your convenience.
How do I preview the playlist’s content?
You can see exactly what is being shown on your TV screens as if you would view that content if you had a Player connected to your screen. With a simple click, you can see how your playlist will display on the TV screen without needing a player or hardware.
You only have to fill the playlist with the media of your choice and then click the Preview button at the top left corner.
A new window will appear, and the playlist will start being displayed.
Allow pop-ups
Your browser might block the pop-up when you click the Preview button. Please click the options button in your browser and click Allow pop-ups
Managing Playlists
You can see a list of the playlists currently created in your account in the Playlists section. Information about your playlists is organized in the following columns:
- The Name of the playlist
- The Description of it (if any)
- The Timestamp (date and time) that the playlist was modified for the last time
- Icons of the Media Type that are included in the playlist
- The Workspace (for accounts in the Enterprise plan) that the image belongs
- The Actions column
If you click on the three dots icon in the Actions column, you will be presented with a list of actions you can apply to your playlists.
Click on each tab below to see a short description.
Change the details of a playlist by clicking the” Edit” button.
Check out the “Adding a Playlist” section above for more details.
Create an exact copy of the playlist with a new name.
You can move playlists to other Workspaces (for accounts in the Enterprise plan).
Delete the playlist.
Additional Control Settings
The Search box in the top-left corner allows you to sort out your playlist listing quickly. You can search using any column by name, date, workspace, etc.
You can select more playlists by clicking the square box left to their thumbnail. Click the Actions button at the bottom to Move or Delete all the selected playlists simultaneously.