Table of Contents
- Overview
- Layout Editor Outline
- Step 1 – Creating a New Layout
- Step 2 – Exploring the Left Side Menu
- Step 3 – Designing on the Canvas Frame
- Step 4 – Customizing Your Layout
- Step 5 – Adjusting Layout Settings from the Top Navigation Bar
- Step 6 – Previewing Your Layout
- Step 7 – Managing Your Layouts
- Best Practices for a Great Layout
- F.A.Q.s
Overview
The platform Layout Editor is where you design the content that appears on your screens. It allows you to combine text, media, apps, playlists, and more into a single, visually engaging layout, all without needing design experience. With the redesigned Layout Editor, everything is now faster, more intuitive, and easier to use. The interface has been restructured to match modern design tools, so you can focus on creativity and efficiency.
This guide covers everything you need to know to get started, from creating your first layout to adding elements, customizing them, and managing your content.
Layout Editor Outline
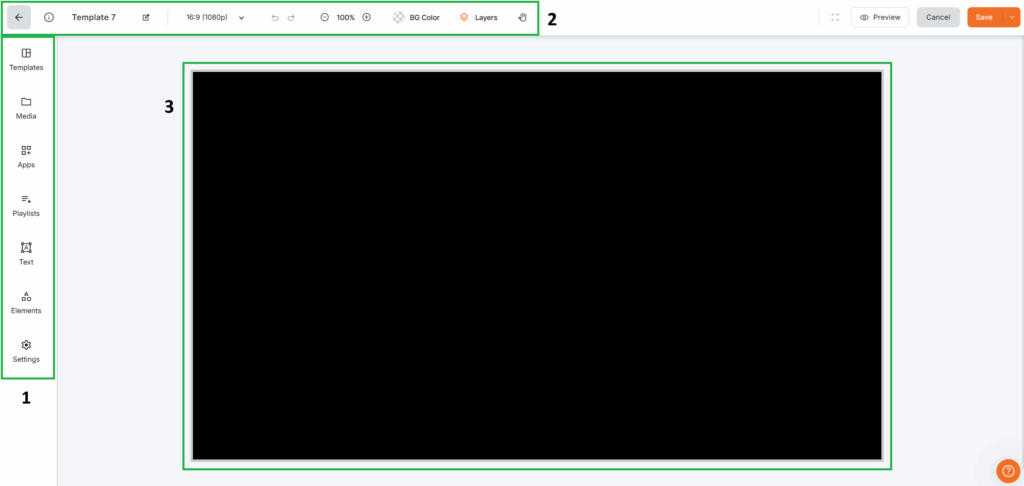
When you open a layout, the editor is divided into four main areas:
- Left Side Menu (1): Add text, images, videos, shapes, clipart, apps, and playlists to your layout.
- Canvas Frame (Center) (3): The main design area where you place, arrange, and resize elements.
- Top Navigation Bar (2): Manage layout name, resolution, background color, undo/redo, and layers.
- Toolbar (Contextual): Appears when you select an element and gives you editing options specific to that item.
Step 1 – Creating a New Layout
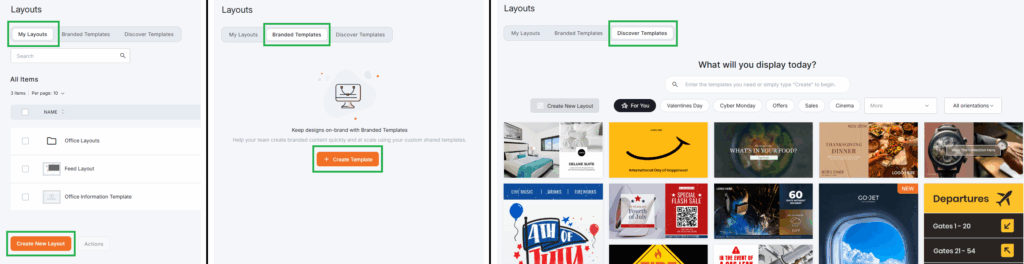
You can create a new layout from scratch or start from a pre-designed template. From the Layouts section in your platform’s dashboard, you can either:
- Create a new blank template: Under the My Layouts tab, click either on the Create New Layout button if you already have other templates or on + Create Template if you don’t have others. This option allows you to gain full control of your template.
- Create a new blank branded template (only available on certain plans): Under the Branded Templates tab, click on the + Create Template button. This option allows you and your team to create branded content quickly and at scale using your custom shared templates.
- Select a ready-made template design for customization: Under the Discover Templates tab, select any pre-created template you like and customize it according to your needs.
Lastly, once you land on the layout page (either new or ready-made), you must name it by changing its predefined name from the top left corner.
💡 Tip: Even after creating or opening a layout, you can browse and apply templates from the Templates tab inside the Layout Editor.
💡Tip: Templates are great for quickly building signage with a professional look. You can always modify them later to match your brand.
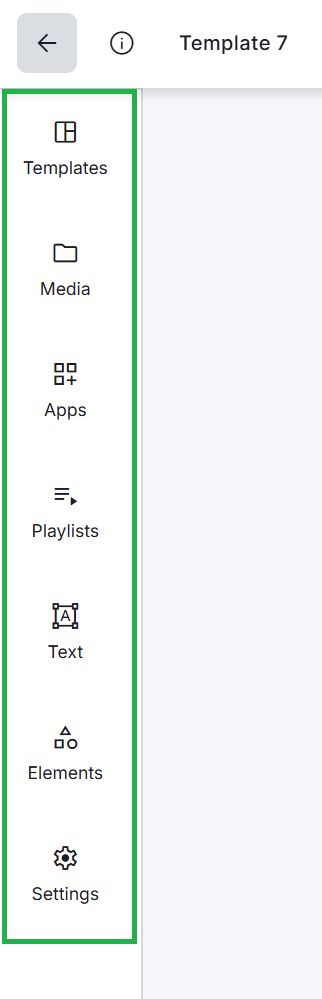
Step 2 – Exploring the Left Side Menu
The Left Side Menu is where you’ll find everything you can add to your layout, along with some layout settings:
- Templates: Browse ready-made templates directly inside the Layout Editor. From here, you can preview, apply, or replace templates without leaving the editor. For detailed instructions, see Using Templates in the Yodeck Layout Editor.
- Media: Upload images, videos, audio, documents, and web pages, or select them from your library.
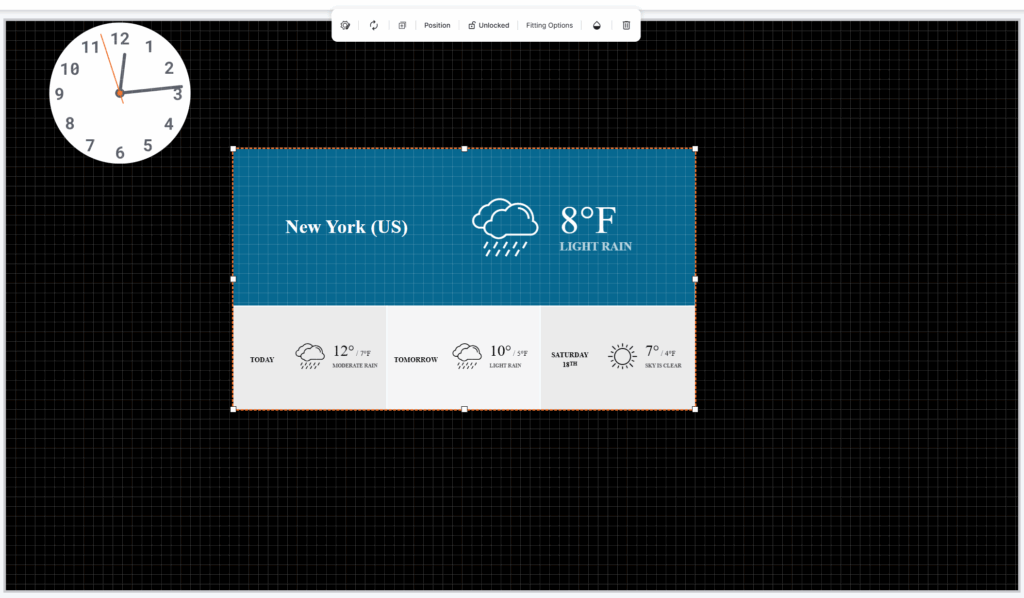
- Apps: Include dynamic widgets like clocks, weather, and more.
- Playlists: Insert existing playlists into your design.
- Text: Add text boxes with customizable fonts, sizes, colors, and alignment.
- Elements (Shapes & Clipart): Add visual elements to highlight content.
- Settings: Manage the layouts, background audio, snap-to-grid option, lock, and availability.
To add an element, you need to first select one of the menu options and then:
- Either click on an item to insert it onto the canvas frame.
- Or drag and drop an item directly where you want it on the canvas frame.
💡Pro Tip: Frequently used shapes and graphics will appear in the “Recently Used” section for quick access.
Step 3 – Designing on the Canvas Frame
The Canvas Frame is where you visually build your layout. Each element you add can be moved, resized, and layered.
- Move elements: Click and drag them into position.
- Resize elements: Drag the corner handles to scale up or down.
- Align precisely: Use the “Snap to Grid” feature for pixel-perfect placement.
Step 4 – Customizing Your Layout
When you select an element on the canvas frame, a toolbar with editing and fitting options specific to that type of content appears at the top.
- Font family and size
- Text and background color
- Bold, italic, underline
- Alignment and spacing
- Positioning adjustments of the component on the levels of the Canvas Frame.
- Duplicate, lock, rotate, or delete

- Replace media
- Fitting mode: Fill, Fit, or Stretch
- Transparency toggle
- Advanced image editing via Pixie Editor
- Positioning adjustments of the component on the levels of the Canvas Frame.
- Duplicate, lock, or delete

- Color and stroke settings
- Flip and rotate options
- Positioning adjustments of the component on the levels of the Canvas Frame.

💡Pro Tip: Use the multi-selection feature (Shift + Click) to select and edit multiple items simultaneously; a major time-saver when adjusting layouts with many elements.
Step 5 – Adjusting Layout Settings from the Top Navigation Bar
You can control several global settings from the Top Navigation Bar:
- Layout Name: Rename layouts inline.
- Resolution & Aspect Ratio: Choose from predefined sizes (Full HD, 4K, etc.) or set a custom one.
- Background Color: Use the built-in color picker to instantly set a solid background.
- Undo/Redo: Reverse or reapply recent changes.
- Layers Panel: Reorder, hide, or lock elements.

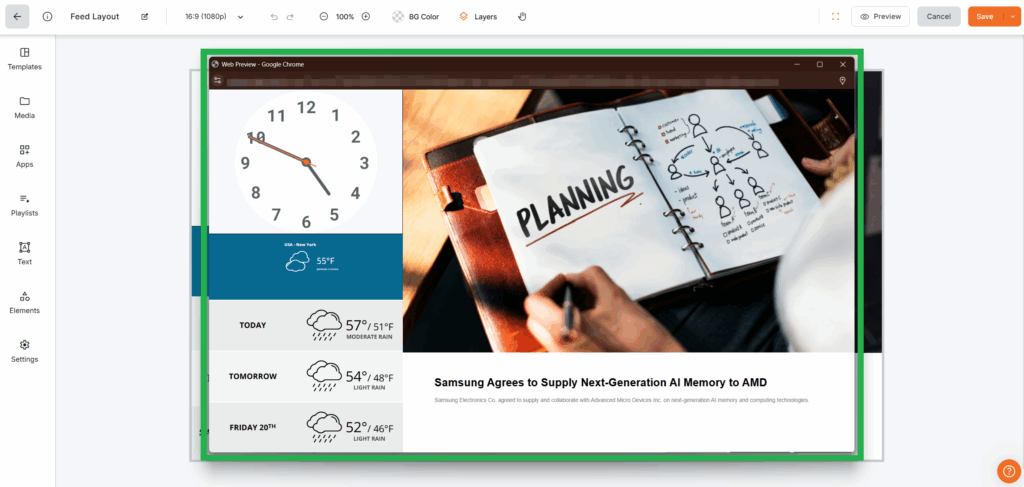
Step 6 – Previewing Your Layout
Before publishing, you can preview your layout to see exactly how it will look on screen.
- Click Preview in the top-right corner.
- A new window will open showing your layout as it would appear on your player.
- Adjust any elements if needed and Save your changes.
⚠️Browser Tip: If nothing happens when you click “Preview,” your browser may be blocking pop-ups. Allow pop-ups for app.platformName.com to enable previews.
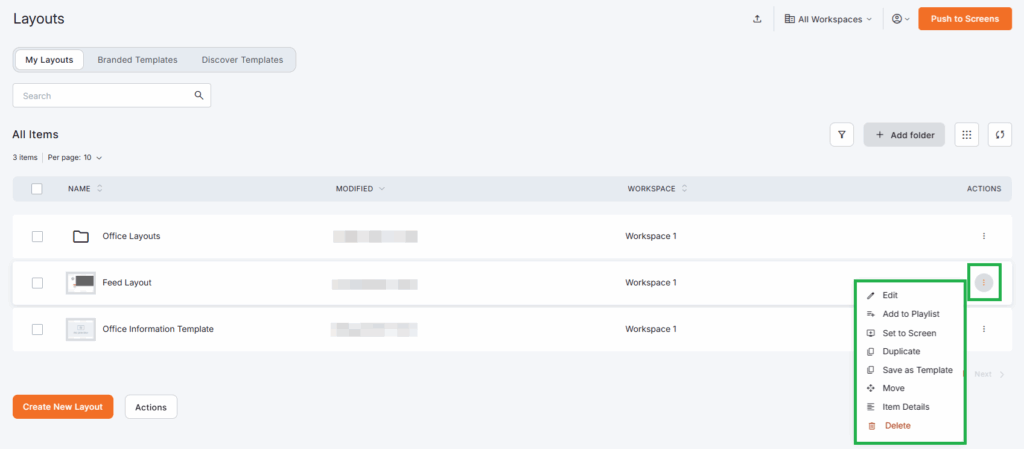
Step 7 – Managing Your Layouts
Once your layouts are ready, you can manage them from the Layouts page:
- Edit: Open and update any layout.
- Duplicate: Create a copy for testing or versioning.
- Move: Transfer layouts between workspaces (Enterprise only).
- Delete: Permanently remove a layout.
- Add to Playlist: Add the selected layout to an existing playlist.
- Set to Screen: Directly set this layout on your choice’s screen(s).
- Save as Template: Save this layout as a template to be also available under the Branded Templates tab for your team, as well as for future endeavors.
- Item Details: You can check the layout details and logs about its date and time of creation and modification(s).
💡Pro tip: Overall, you can further organize your Layouts using Folders and the Search functionality to keep your library structured.
Best Practices for a Great Layout
- Match your aspect ratio: Always use a layout that matches your display’s resolution to avoid stretching or black bars.
- Use layers strategically: Keep important elements on top and group related items.
- Maintain brand consistency: Use your company’s colors, fonts, and logos.
- Test before publishing: Always preview layouts to catch errors before pushing them live.
F.A.Q.s
Got questions? We’ve got answers! This section addresses common questions about the platform’s Layout Editor.
Can I play background audio while videos are running?
Yes — but background audio takes priority. Once enabled, it will continue playing and override any video audio on screen.
Can I stop background audio mid-playback?
Not at this time. To hear audio from your video, you must disable the background audio setting in the layout.
What happens if I resize my layout?
Your content will adjust to the new resolution, but you may need to reposition or resize elements for the best result.
Can I duplicate a layout and reuse it?
Absolutely. Duplicating layouts is a great way to maintain consistency while experimenting with design changes.
What happens if background audio is enabled?
It will override any audio from videos or other media. Currently, there’s no option to switch back to video audio mid-playback automatically.