Table of Contents
- Overview
- Before You Start
- Step 1 — Configure Your Sony Bravia for Remote IP Control
- Step 2 — Create and Register a New Android Player in the Platform
- Step 3 — Add Your Sony Pre-Shared Key to the Player Configuration
- Step 4 — Enable Sony Bravia Device Management in the Platform
- Step 5 — Test Remote Power / Restart Commands
- You’re All Set!
- F.A.Q.s
- Troubleshooting
Overview
With Remote Device Management (RDM) enabled on your Sony Bravia Professional display, the platform can send power-related commands (like Turn Off, Turn On, or Restart) directly to the screen through the platform’s Android (APK) installed on the TV. Once configured, these remote actions help you manage screens efficiently.
This guide walks you through:
- Configuring your Sony Bravia Professional display for remote IP control.
- Registering the TV as an Android Player in the platform.
- Linking both sides using a Pre-Shared Key.
- Enabling the Sony Bravia Device Manager profile so ad-hoc commands (power off / restart) actually control the display.
Before You Start
Make sure you have:
- ✅ A Sony Bravia Professional series display that supports Remote device settings and IP Control.
- ✅ The platform’s Android (APK) installed* on your Sony Bravia.
- ✅ A platform account with permission to add/manage screens.
- ✅ The Sony Display and the platform’s Player connected to the same network (and allowed to communicate over the local network).
ℹ️ * You must complete the platform’s Android (APK) installation on the Sony Bravia before following the steps below.
Step 1 — Configure Your Sony Bravia for Remote IP Control
On your Sony Bravia Professional remote:
- Press Home and open Settings.
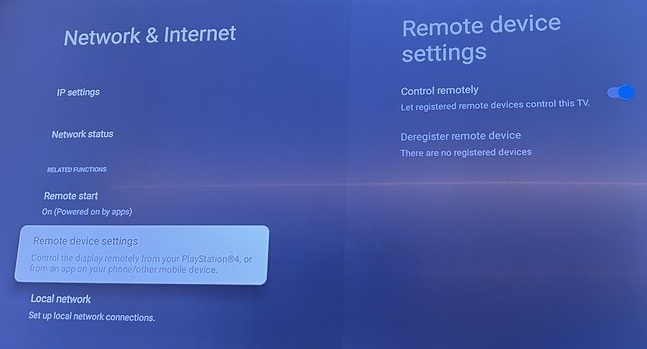
- Go to Network & Internet.
- Select Remote device settings.
- Enable Control Remotely.
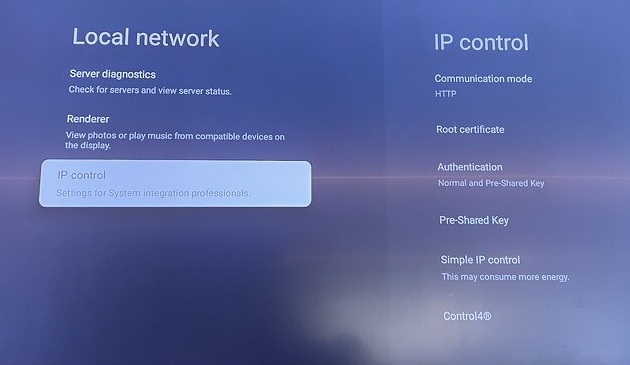
- Go one step back to Network & Internet.
- Select Local Network.
- Choose IP Control.
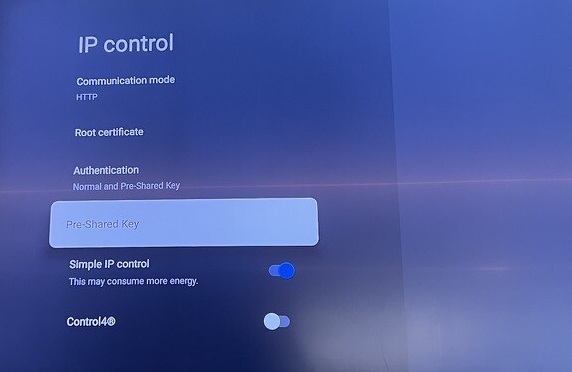
- Set Authentication to Normal and Pre-Shared Key.
- Open the Pre-Shared Key menu.
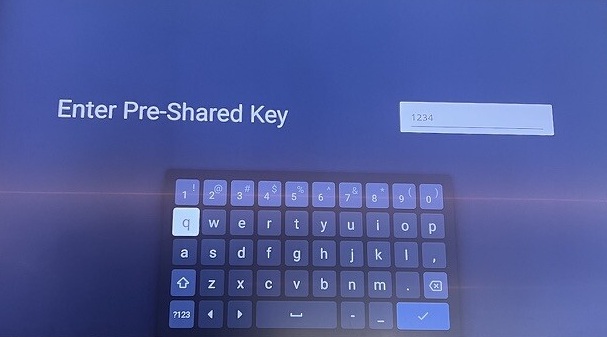
- Enter your preferred Pre-Shared Key** and save your settings.
🔐 ** Important Information on the Pre-Shared Key:
- The Pre-Shared Key must be between 16 (min) to 20 (max) alphanumeric characters in total.
- Treat it like a password and keep it secure.
- You will need to enter this exact same value later in the Platform.
Step 2 — Create and Register a New Android Player in the Platform
Now you will add the Sony Bravia Professional (with the platform’s APK installed) as an Android Player in your platform’s account.
- Sign in to your platform account.
- Navigate to the Screens section.
- Click Add Screen.
- Select Android Player as the device type.
- Follow the on-screen instructions to register your screen with the platform.

ℹ️Once registration is complete, the new screen will appear in your Screens list (Dashboard).
✅ Make sure the screen appears and begins connecting (Online/Updating). This means the platform’s Android Player is communicating correctly.
Step 3 — Add Your Sony Pre-Shared Key to the Player Configuration
Next, you’ll link the Sony Bravia’s IP control to the platform’s Player by providing the same Pre-Shared Key inside the screen’s advanced configuration.
- Open your newly registered Sony screen in the platform.
- Click the Advanced tab.
- Select the Customization tab within the Advanced section.
- In the Advanced Player Directives field, add the following line:
android_sony_preshared_key=YOUR_PRESHARED_KEY - Replace
YOUR_PRESHARED_KEYwith exactly the Pre-Shared Key you configured on the Sony Bravia. - Click Save.
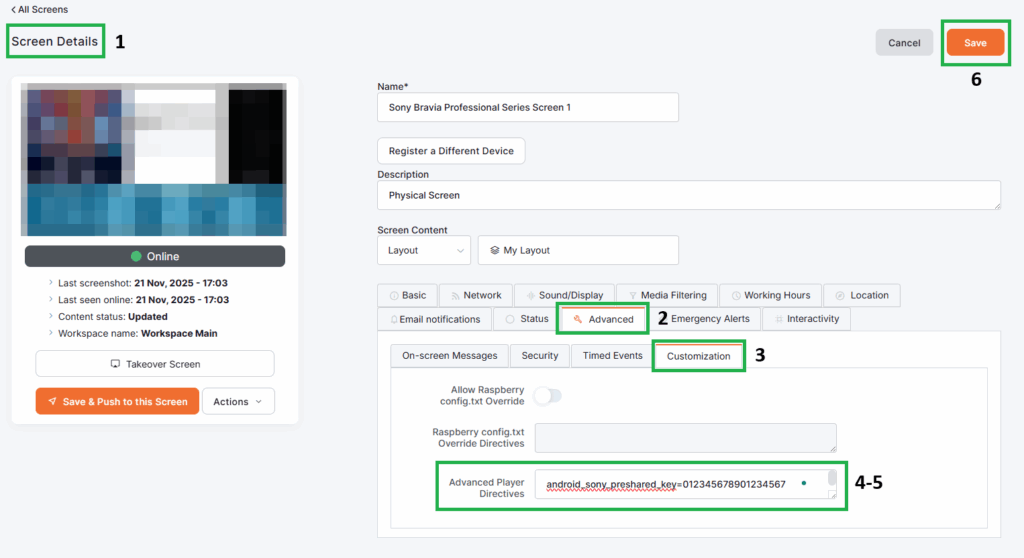
ℹ️Your Player will automatically update to apply this new configuration.
⚠️ Make sure the key matches exactly
- Same spelling, same capitalization, no extra spaces
- If it doesn’t match, the platform will not be able to control the TV via IP.
Step 4 — Enable Sony Bravia Device Management in the Platform
Now you can enable the dedicated Sony Bravia device management profile so power commands (Turn Off / Turn On / Restart) are sent properly to your display.
- Open the same screen again in the platform (if it’s not already open).
- Go to the Advanced tab.
- Select Device Manager.
- From the dropdown menu, choose Sony Bravia.
- Click Save using the button at the top-right corner.
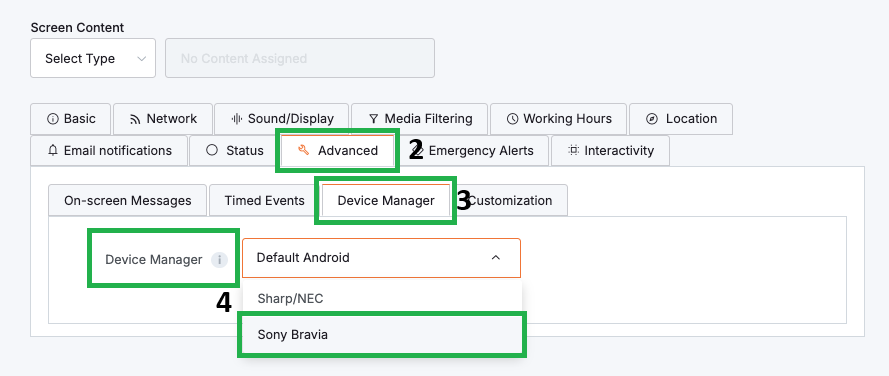
ℹ️Your Player will reload and apply the new Sony Bravia Device Manager profile.
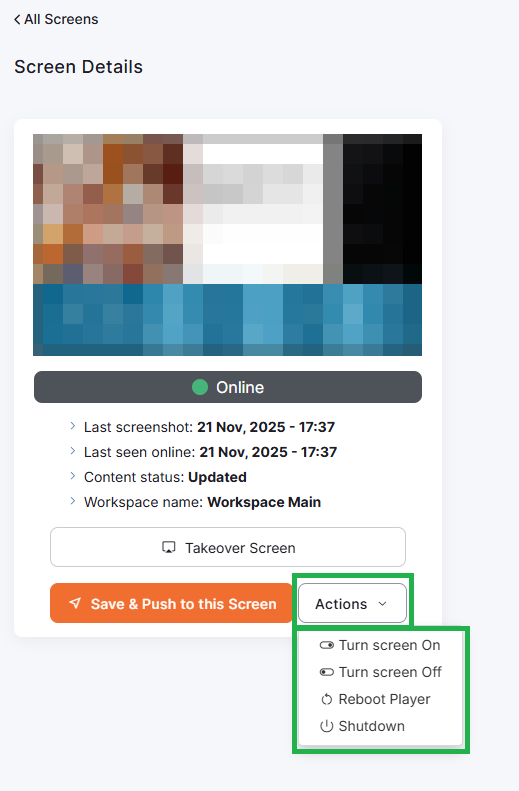
Step 5 — Test Remote Power / Restart Commands
With everything configured, it’s time to verify that ad-hoc commands work as expected.
- In the platform, locate your Sony Bravia screen in the Screens section.
- Open the screen’s details or controls area.
- Use the available Power or Restart/Reboot control for this screen:
- Send a Power Off command and confirm that the Sony Bravia display turns off.
- Send a Power On (if available) or restart command, and confirm that the display responds.
- Send a Restart/Reboot command to ensure the display restarts successfully.
ℹ️If the Sony display responds correctly, your Remote Device Management (RDM) setup is complete.
You’re All Set!
Your Sony Bravia Professional Display is now fully integrated with the platform using IP Control and the Sony Bravia Device Manager profile. You can:
- Turn the screen on or off, or restart it remotely.
- Schedule operating hours so the display follows your business hours
- Manage the display like any other platform-supported device, all from your platform’s account
F.A.Q.s
Got questions? We’ve got answers! This section addresses common questions about Sony Bravia RDM functionality via the platform’s Android (APK).
Not necessarily. The platform communicates with the display locally through the platform’s Android Player, so the TV does not need a static IP. However, using DHCP reservation or a static IP can help avoid network-related issues after router reboots or network changes.
You must update the android_sony_preshared_key value in your platform’s Player’s Advanced Player Directives to match the new key. If the two values don’t match, the display will stop accepting remote commands.
Yes, you can reuse the same key across multiple displays, but it isn’t recommended from a security perspective. Using unique Pre-Shared Keys per display provides better traceability and reduces the risk of unauthorized control.
No. The display must be online and actively communicating with the platform for any power command—scheduled or ad-hoc—to be executed. If the Player is offline or the TV has no network access, commands will not reach the display.
Some Sony Bravia models disable certain network functions while powered off. To fix this:
Go to Settings → Power → Power Saving and ensure aggressive power-saving modes are disabled.
Make sure IP Control is enabled specifically for both power states.
Check your model’s manual, as behavior varies between generations.
Powering on typically requires the TV’s network interface to wake up before it can respond. This may introduce a short delay (5–20 seconds) depending on the model and its network settings.
Yes. Remote Device Management works as long as the platform’s Android Player service is running in the background. However, force-closing the APK or restricting background apps may interrupt remote control.
It works over both Wi-Fi and Ethernet. Ethernet is recommended for reliability, but Wi-Fi is fully supported as long as the display maintains a stable connection to the same local network as the Platform Player.
Confirm that the Pre-Shared Key value is both:
– correctly set on the TV
– correctly written in the Player Directives in the Platform
This is the most common cause of non-responsive commands.
No. The Platform’s Sony Bravia Device Manager currently supports remote power and restart commands. Input switching and volume control must be handled directly on the display.
Yes. A factory reset wipes:
– IP Control settings
– the Pre-Shared Key
– network permissions
You will need to repeat the Sony configuration steps and re-enter the key in the platform’s Player settings.
Yes. Any user with permission to manage the screen can send power commands. All actions are logged in your Platform’s account for accountability.
You can check Sony’s Knowledge Center for information on how their Sony Bravia Professional Series Displays support our RDM functionality.
Troubleshooting
If your Sony Bravia Professional Series display does not respond to power or restart commands, check these common issues:
- Check network connectivity
- Ensure the TV and the platform’s Player are on the same network and can communicate.
- Verify IP Control settings on the TV
- Control Remotely is enabled.
- Authentication is set to Normal and Pre-Shared Key.
- The Pre-Shared Key is set and saved.
- Confirm the Pre-Shared Key in the Platform
- In Advanced → Customization → Advanced Player Directives, verify the line:
android_sony_preshared_key=YOUR_PRESHARED_KEYmatches the TV’s Pre-Shared Key exactly.
- In Advanced → Customization → Advanced Player Directives, verify the line:
- Check the Device Manager selection
- In Advanced → Device Manager, make sure Sony Bravia is selected and saved.
- Allow time for the Player to update
- After changes, give the Player a moment to download the new configuration and reload.
- Optionally, reboot the Player or the TV if necessary.