Table of Contents
Introduction
Available only on the Enterprise plan!
This feature is only available on the “Enterprise” Plan. You might not see some menus below if you are not on the “Enterprise” Plan.
Remember that the “Enterprise” Plan is free if you only manage one screen to evaluate these features quickly.
Intro
The Security Assertion Markup Language (SAML) is an XML-based standard to exchange authentication and authorization information. SAML was developed by the security services technical committee of the Organization of the Advancement of Structured Information Standards (OASIS). SAML allows federated systems with different management systems to interact through simplified and single sign-on exchanges. A technical overview is available from OASIS.
OASIS cites the following advantages of SAML:
- SAML abstracts the security framework away from platform architectures and particular vendor implementations. Making security more independent of the application logic is an important tenet of Services-Oriented Architecture.
- SAML does not require user information to be maintained and synchronized between directories.
- SAML enables single sign-on by allowing the user to authenticate at an identity provider and access service providers without additional authentication. In addition, identity federation (linking multiple identities) with SAML allows for a better-customized user experience at each service while promoting privacy.
- Using SAML to “reuse” a single authentication act (such as logging in with a username and password) multiple times across multiple services can reduce the cost of maintaining account information. This burden is transferred to the identity provider.
- SAML can act to shift responsibility for proper identity management to the identity provider, which is more often compatible with its business model than that of a service provider.
Here, you will find some helpful information on configuring a single sign-on using SAML for your account.
Advanced Settings
Group Managed Service accounts are perfect identity solutions for services running on multiple hosts, and using group password management requires no administration overhead as password management is handled automatically using known Servers across multiple hosts.
If you intend to configure a federation server farm environment in Active Directory Federation Services (ADFS), you must create and configure a dedicated service account in Active Directory Domain Services (ADDS) where the farm will reside. You then configure each federation server in the farm to use this account. You must complete the following tasks in your Account when you want to allow client computers on the corporate network to authenticate to any of the federation servers in an ADFS farm using Windows Integrated Authentication.
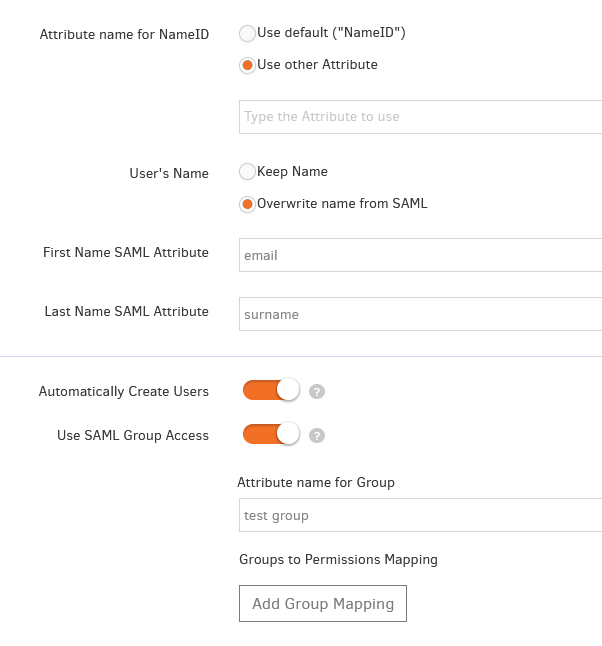
- Attribute name for NameID: Choose if you want to use the default NameID or set another attribute of your choice.
- User’s Name: Keep the same User Name (Username- email) or overwrite it and set it to your ADFS’s user details.
- Automatically Create Users: Enable this to use ‘Just-in-Time Provisioning’ with SAML, i.e., to automatically create new authorized Users coming in from your Identity Provider.
- Use SAML Group Access: Enable this to modify User permissions based on a SAML Group automatically. Use Groups to Permissions Mappings to specify the Permissions that each Group has.
- Type a name for your Group.
- By clicking the grey button called “Add Group Mapping, “you can create groups like your ADFS groups. The users joining this group will inherit the Group’s Account Permissions and Roles. Each Group can have different Account Permissions.
- If you have the Workspace feature, you can also set different roles for this group by clicking the “Add Role” button.
Groups to Permissions Mapping setup wizard
Enable this to modify User permissions based on a SAML Group automatically.
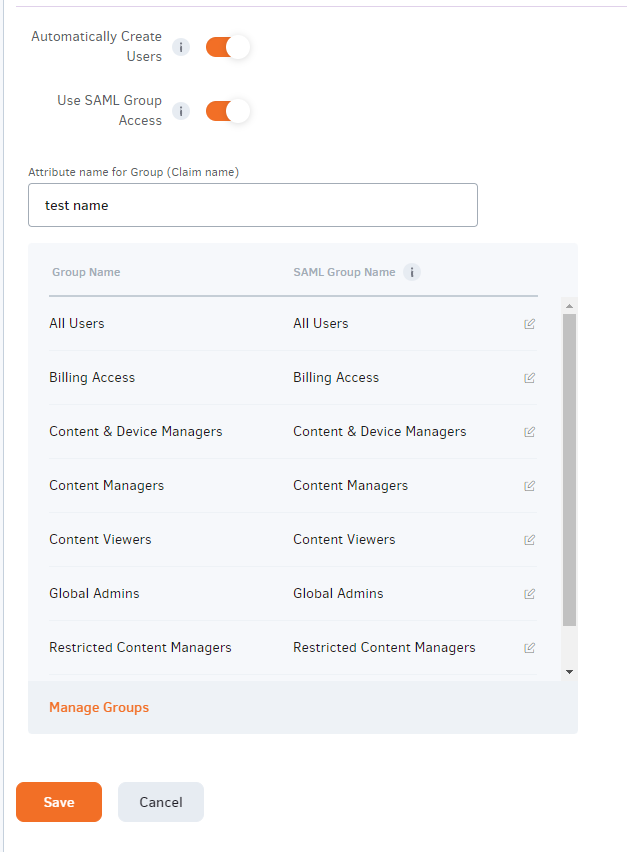
Each user Group can be mapped with a SAML Group like an ADFS group. Users joining this group will inherit the Group’s Account Permissions and Roles, and each user Group can have different Account Permissions.
- Type a name for your Group.
- By default, the existing user Groups will be displayed by enabling the SAML Group Access.
- You can add the SAML Group name you want to map with by clicking the edit button on the right side of each group record.